First impressions of Flutter: Part 2

In the previous article in this series, we looked at my first impressions of Flutter, Google’s increasingly popular multiple-platform development tool. Flutter has me quite impressed, but I am curious to know – How easy is it to bring in third party dependencies for multiple platforms?

Integrating third party dependencies in Flutter

In my experience working in mobile development, third party dependencies are brought in via platform specific dependency managers – CocoaPods for example in iOS, or the Gradle build system in Android. How can Flutter manage third party dependencies, and make them available for multiple platforms? Well, it turns out that Dart has its own dependency manager, called the Pub package manager.

When you create a Flutter project, you will find a file called pubspec.yaml is automatically generated in the root folder. This file contains a few basic preference details, such as the package namedescriptionversion number for your application and environment where you can specify the version numbers of the Dart and Flutter SDKs we are expecting our code to use to compile. There is also a section called flutter, where you can specify image assets to include in your app, or custom fonts.

What we are most interested in right now, though, is a section called dependencies. It is here that we can specify third party dependencies needed for the project. In fact – even in a fresh Flutter project you will find you already have dependencies listed here – flutter for the Flutter SDK itself, and cupertino_icons, to give you access to the Cupertino Icons Font for iOS.

You can specify the source for a dependency such as a local path or a git repository, but probably the easiest way to download your dependency is to get it from pub.dev, the official repository for Dart and Flutter, sort of the cocoapods.org of the Flutter world. Though pub.dev might not have direct equivalents for each framework available in cocoapods.org, it does contain many frameworks and libraries with solutions for most common problems.

As a test case for integrating third party dependencies, let’s take a look at integrating Sentry in a Flutter project.

Integrating Sentry in Flutter

For those not familiar, Sentry is a tool that tracks any runtime errors in your app. Sentry also helps you to discover performance issues in your app by automatically monitoring how well your app is performing during any potentially slow operations, such as HTTP requests or file operations.

To start off with integrating Sentry into a Flutter app, I search for Sentry in pub.dev.

At pub.dev, the sentry package is actually listed under ‘Top Dart packages’, but the description does warn you that “For Flutter consider sentry_flutter instead”. It looks as though if you are using pure Dart, you should use the sentry package, but if you are working with Flutter, it might be best to check out the sentry_flutter package. There, as with all package listings, you’ll find an ’installing’ tab which gives you specific advice as to best approach for installing the package.

That said, for most (if not all?) packages, the instructions for adding the package seem to be pretty much the same.

You’ll need to open the Terminal. If you are running Android Studio, you’ll find the Terminal is accessible right there in the interface – there’s a Terminal tab at the bottom left of the interface.

There you’ll want to add the package listing to your app, by typing the following:

flutter pub add [package name]

For sentry_flutter for example, you’ll want to type:

flutter pub add sentry_flutter

This will automatically add the latest version of the package to your app. If you have your pubspec.yaml file open, you might need to close and reopen it to see the changes.

You will probably now see something like the following line, in the dependencies section:

`sentry_flutter: ^6.6.3`

In addition to adding this dependency line to your pubspec.yaml file, the ‘flutter pub add’ command also automatically runs the ‘flutter pub get’ command, which will download any dependencies in your project.

The version number you see of course may change in the future. If you want to update your dependencies to the latest version, you can run the ‘flutter pub upgrade’ command.

You can check that the sentry package is now accessible in code, by simply importing it in the main.dart file:

import 'package:sentry_flutter/sentry_flutter.dart';

If there are any problems, this line will have a red line underneath it. If all is well, this line will be simply greyed out, just indicating that this import is not yet being used.

I did encounter one hiccup during the process – after adding sentry_flutter as a dependency, running the app on the iOS simulator directly from Android Studio caused errors. Curiously running the app from the terminal was working fine, suggesting possibly some sort of permission issues in Android Studio. This may have just been an issue I’m seeing, but in case anyone else encounters this, I did find a work-around, which was to run Android Studio from the terminal. This can be achieved with the following:

open /Applications/Android\ Studio.app

Once the Sentry dependency is added to your project you should now be able to import it in code:

import 'package:sentry_flutter/sentry_flutter.dart';

You should now be able to use Sentry code in your app. For example, to initialize SentryFlutter, you’ll want to replace main() with an asynchronous version of the method, that passes in the DSN (data source name) for your project:

import 'package:flutter/widgets.dart';
import 'package:sentry_flutter/sentry_flutter.dart';

Future<void> main() async {
  await SentryFlutter.init(
    (options) {
      options.dsn = 'DSN GOES HERE';
      options.tracesSampleRate = 1.0; // <- reduce this rate in production
    },
    appRunner: () => runApp(MyApp()),
  );
} 

Now you have initialized Sentry, you may choose to create an intentional error to check that Sentry is recording errors correctly. You can find example Dart code for these tasks by looking for the Installation Instructions button in your app’s Sentry project online.

Once Sentry has sent event data to the server, you can access information about your app’s errors and performance in the web portal. To do this, you’ll need to have set up a project for your app in your account on the Sentry website. When creating a project for a native mobile app you would usually have to specify whether you are creating an iOS or Android project. I was curious to know how Sentry would deal with a Flutter project which can work on either platform. Actually, when you are building an app in Flutter, it is not necessary to specify either iOS or Android platforms – instead you can actually specify that you are building a Flutter project, and the same DSN will be relevant for both platforms.

Wrapping up

Well, if I was impressed in the previous article with how smoothly Flutter operates across platforms, with just one codebase requiring both less development time and less maintenance time, experimenting with integrating third party dependencies just confirms for me Flutter’s status as a production ready tool for building cross-platform apps. I recommend you give it a try. I for one am looking forward to working with it more!

This post was originally posted on Sentry.io, link here.

Tagged with:
Posted in Flutter

First impressions of Flutter: Part 1

Having just spent a lot of time converting an iOS app to Android, I can really appreciate the value of a cross-platform tool with a single codebase. It’s time to check out the state of play in cross-platform development!

Cross-platform app development – a quick catch-up

Ever since iPhones and Android phones have been around, there have been tools to facilitate development on both mobile platforms with just one codebase. Early on, the main contenders were Unity, Adobe AIR and PhoneGap. PhoneGap was made open-source in 2011 and rebranded Cordova, and since then several other cross-platform tools have been built on top of it, such as the Ionic framework, released in 2013.

One drawback of these tools was that native components were not easily available – apps built in these tools often had their own custom look, using HTML5 components, or were often more used in game development or apps with their own UI design. This all changed when native cross-platform development became possible. Xamarin, developed by Microsoft in 2014, React Native, developed by Facebook (now Meta) in 2015, and Flutter, developed by Google in 2017, allowed cross-platform apps to look and behave like native apps.

Until recently, React Native easily lead the field of cross-platform tools, with 42% of developers choosing it in 2019, while other tools only reached 30% or fewer (link). However, since then Flutter has experienced quite a rise in popularity. Flutter was used by 42% of developers in 2021. Meanwhile React Native dropped a few points to 38%. (link)

In StackOverflow’s 2021 developer survey, Flutter was loved by 68% of developers, React Native 58%, and Cordova just 31%. With approximately one third of mobile app developers now using cross-platform tools (link), Flutter definitely looks worth checking out!

Flutter – let’s check it out

In this article I’m going to take a look at Flutter from the perspective of a native iOS developer.

For those interested in following along and checking Flutter out for yourself, you’ll find good guides at flutter.dev. As is usually the case with new software, let’s start with installation.

Flutter – installation

The first surprise with Flutter was the installation process, which to be honest, was a little laborious. There is of course an installer which contains the Flutter SDK, but there is also a series of steps that have to be followed to be ready to go. To run apps on Android you’ll need to install Android Studio, and add “virtual devices” to be able to run the app on the Android emulator. To run apps on iOS you’ll also need to ensure that the latest versions of Xcode and CocoaPods are all set up and ready to go too.

You’ll also need to do some tinkering in Terminal to prepare your machine, such as agreeing to iOS and Android licenses. You’ll need to add Flutter to your PATH to be able to run Flutter commands in Terminal. The Flutter tool is quite useful in the installation process – just run flutter doctor and see if you have missed any steps or dependencies.

From the point of view of someone who avoids Terminal if possible – give me a graphical UI any day – all of this messing about in the Terminal was a little unexpected, but not too difficult.

The next surprise was that Flutter doesn’t have its own IDE – it allows you to use your own preferred IDE (although Xcode isn’t in the list) – Android Studio, IntelliJ, VS Code, or Emacs. It just takes installing a Flutter plugin in your IDE to able to run your app from within the IDE, and also have access to code completion, syntax highlighting, debugging, etc. As you have Android Studio installed anyway to run apps on Android, unless you have a strong preference otherwise, it probably makes most sense to go ahead and work in Android Studio.

Flutter – first impressions

Once you install the Flutter plugin, working with Flutter in Android Studio is surprisingly well integrated into the IDE. Creating a new Flutter project is as straightforward as creating a native Android project. You can choose which platforms you would like to target – iOS, Android, or you can even target web – or the desktop, whether that be MacOS, Windows or Linux. Flutter generates folders for each target which are then used to build your app. Be sure to give your project a name with all lower case, separating words with underscores, Flutter project names do not like camel case!

The most important folder name to be aware of is lib – this is where your source files live, basically where you edit your application. To begin with, this folder just holds the file main.dart, which is where your app begins execution.

My first confusion with Flutter was where to find this source file in the project window on the left, or even where to find the lib folder. After some digging, I found that after creating the Flutter app, the project window by default contained the Android project structure, which only shows files and groups of files relevant to the Android project. To find all files related to your project, you’ll need to be sure you have Project selected in the dropdown at the top of the project window. You should now see the lib folder, where you’ll find your main.dart source file.

Once you’ve created your first Flutter project, the first thing you might notice is that you’re in a dart file – what is a dart file you may ask? Well, Dart is the language you will be using to develop in Flutter. It is a relatively new language, developed by Google and released in just 2013.

Similar to how Swift uses the @main attribute to identify the main entry point for your app, all Dart programs use the main method (by convention located in main.dart) as the main entry point for execution. In Flutter, this main method will run the app itself.

After some exploration of the code, it becomes clear that similar to working in SwiftUI, we are building the interface of our app right here in code. In Swift/UIKit we can use the storyboard, in SwiftUI we have Xcode previews – the question is, is there a way in Flutter to see the interface visually while we build it in the IDE? The answer is – not really, at least there doesn’t seem to be out of the box in Android Studio – but what Flutter does offer isn’t a bad substitute, and it’s called hot reload.

Whether you’re running your app on the iOS simulator, Android emulator, or on your device, you can see your interface running live as you work. After saving any changes to your code, your app running on your device/emulator/simulator should automatically reload and any changes you have made will be reflected. Not as convenient perhaps as modifying your interface directly in a visual editor, but a fancy solution nonetheless.

Outside of the Android Studio toolkit, there are also other approaches to visual editing in Flutter. For example, an ‘experimental’ plugin for VS Code called Flutter Preview basically gives you the equivalent of Xcode previews. You can also find a fancy web-based app called Flutter Studio where you can edit a Flutter app using a visual interface.

Dart vs Swift

The syntax of Dart is probably not going to be too unfamiliar to you if you’re familiar with other modern languages such as Swift. Just like Swift, variables are declared with var, variables are type safe and use type inference to avoid the need for explicit typing.

Dart distinguishes between constants where the value is known at compile time (const) and those that are only known at run-time (final).

Function declaration syntax is a little different to Swift, but again, not so unfamiliar if you’ve ever come across C or Java function syntax.

While Swift might declare a function this way:

func submit(name: String, surname:String, age:Int) {

In Dart it would look like this:

void submit(String name, String surname, int age) {

Rather than init, class constructors in Dart have the same name as the class, and can automatically set instance variables by specifying them in the constructor parameters. For example:

class Person {
  final String name;
  final String surname;
  final int age;
  Person(this.name, this.surname, this.age);
}

In Swift you would be used to String interpolation with syntax such as:

print("Your name is \(name)");

In Dart however, the syntax is closer to JavaScript, using a $ sign:

print('Your name is $name')

So much of Dart, though, is almost spookily familiar, coming from a Swift background. Dart has classes, inheritance, enums, generics, closures, control flow statements, multiline strings with triple quotes, and since March 2021, Dart even has optionals, or null-safety, all with very similar if not identical syntax to Swift.

There are some notable differences however – for example Dart core libraries don’t support structs, or tuples. On the other hand Dart does have an intriguing concept called a mixin, which allows you to reuse the same code in different classes.

Flutter vs SwiftUI

Another feature of the Dart source code you encounter in a Flutter project is that it uses a declarative rather than imperative syntax. You would be familiar with declarative syntax if you have used SwiftUI. The difference is often described as: imperative programming describes how the program does something while declarative programming describes what the program does.

It is probably easier to start getting your head around the difference with a bit of pseudo code. Here is how we might configure a view in the imperative style:

titleview.setColor(green)
titleview.removeAllChildren()
Text text = new Text('Demo')
titleview.add(text)

And then here is how we might return this configured view in the declarative style.

return TitleView (
  color: green,
  child: Text('Demo')
)

If you have worked with both UIKit and SwiftUI, you will have experienced how much more succinct your code can be with the declarative style. It can also be easier to read, less buggy and easier to maintain.

There are of course differences to how Flutter and SwiftUI work. Everything you can see in SwiftUI is a view, and as views in SwiftUI are structs and therefore immutable by default, SwiftUI allows us to modify properties by prefixing them with the @State property wrapper. (There are other options – @ObservedObject and @EnvironmentObject, but let’s keep things simple for now!)

Meanwhile over in Flutter-land, everything is a widget! Similarly, widgets are completely immutable. Flutter implements a very similar solution to SwiftUI to this problem. If you expect the UI of a widget to change during runtime, this widget would extend the StatefulWidget class, and the widget would retain these changes in a special State object, which is in itself a widget. If you don’t expect the UI of a widget to change, the widget would extend the StatelessWidget class.

Though these solutions sound very similar, there are a couple of important differences. In SwiftUI, a view can contain multiple properties that are tagged with the @State property wrapper. In Flutter, a StatefulWidget contains just one State object which itself can contain multiple properties. While SwiftUI @State objects contain simple values, in Flutter the State object is also responsible for building the widget itself that changes when any properties change.

While SwiftUI automatically updates any relevant views when a property has been updated, in Flutter you’ll need to perform any updates inside a setState() function to be sure the UI gets updated.

As far as laying out widgets in Flutter, you’ll find things work very similarly to SwiftUI, with just differences in terminology. While in SwiftUI you may be used to laying out your views inside stack views (specifically HStackVStack and ZStack), in Flutter you will be using a similar concept called layout widgets. Flutter’s layout widgets are simply called ColumnRow and Container.

Thoughts on Flutter so far

So far, I must say I am actually pretty impressed with Flutter.

If you have experience with Swift and SwiftUI, the transition to Dart and Flutter is surprisingly familiar, and the learning curve not too steep.

I’m also loving that after doing all of your work in one framework – i.e. Flutter – you can build natively for multiple platforms. From the perspective of a native iOS developer, tied to one platform for years, pressing a button to make an app available to other platforms is the dream! I’m looking forward to experimenting more with Flutter, and think seriously about working on any future apps using this multi platform tool.

There is one litmus test I am curious about, though. How easy is it to bring in third party dependencies for multiple platforms? In the next article in this two part series, I’ll be taking a look at this dilemma.

This post was originally posted on Sentry.io, link here.

Tagged with:
Posted in Flutter

Converting Your iOS Application to Android: Part 3

This post was originally posted on Sentry.io, link here.
In the previous two articles we’ve looked at why you should consider converting your application to Android, considerations to be aware of when converting your application to Android, and then in the second article, we looked, in more detail, at the nuts and bolts of converting your iOS application to Android.

In this article, I assume you have converted the functionality of your iOS application to Android – the question now is – what next?

Evaluate your Application

Before doing anything else, just as you would with an iOS application, it is a great idea to double check that you’re happy that your application meets your quality standards. Double check that your application is all working as it should, and there are no bugs or usability issues. Try to break your application. For example, if your application requires internet access, check what happens if you turn wifi off. As we saw in the first article of this series, there is a huge variety of Android devices, with different specs from memory to resolution. Try out your application on different devices or emulators and make sure it looks great on all screens.

Next, check your application meets Android’s standards and quality guidelines. Google Play provides a really useful checklist here, that goes through common issues – issues you may have overlooked, such as preserving and restoring application state, or performance issues.

Set up your Application in Google Play Console

Most likely you’ll be looking to launch your application on Google Play. (As mentioned in the first article of this series, you might also choose to launch on other Android compatible stores, such as the Amazon Appstore or Samsung Galaxy Store, but we’re going to focus on Google Play here.) Once you have paid your one-off registration fee of $25, you’ll want to set up a developer account in the Google Play Console, complete with a developer icon and header image. If you’re looking to earn money from your application, you’ll of course need to set up your bank account details and tax information.

Finally, you will be ready to set up your application’s store listing on Google Play.

In the Google Play Console, select All Apps -> Create App. Give your application a name, decide whether it will be free or paid, and hit Create App. You should now have an application in your Google play Console. Under “Set up your App” you will see a checklist of tasks that you will need to complete to fully set up your application ready for the store – tasks such as setting up a privacy policy, content rating, what category to place your application and of course setting up your application’s store listing, complete with an icon for your application, a feature graphic, video, and screenshots.

Beta testing your application

Before you launch your application on Google Play, it’s a good idea to get a wide range of users to beta test your application.

There are three types of tests available in the Google Play Console:

  • Internal tests are limited to a maximum of 100 testers. They don’t need to be reviewed by Google, so are useful for quick distribution. They are most often used for internal quality assurance prior to beta testing, but if your beta test group is small enough you could use internal tests for beta tests if you like.
  • Closed tests offer a practically unlimited number of testers. (well, technically, you can add lists of tester email addresses up to a limit of 100,000, but alternatively you can add users via Google Groups which have unlimited membership.) To distribute to users, your application beta first needs to be reviewed by Google. You can set up multiple closed tests, to test out different features.
  • Open tests are completely visible to the public on Google Play. Anyone can see your beta and install your application. Open tests have unlimited testers, unless you choose to limit the number yourself. Similar to closed tests, your beta first needs to be reviewed by Google to ensure it meets policy guidelines.

It’s up to you which type of testing makes the most sense for you.

The big question really is, where can you find these kind, friendly folk to test your application? Other than enlisting your mom, your best mate, and calling in a favor from your neighbor, who else would be generous enough to take the time to provide you feedback on your application?

You’ll find groups for finding beta testers on sites such as reddit, such as alphaandbetausers. You’ll also find websites dedicated to finding you beta testers – I’ve found betabound.com useful. In both cases, to maximize take-up, you’ll want to present a compelling case for people to test your application. Maybe that’s just an early look at an interesting sounding application, or maybe you are in a position to offer something for free to beta testers. A simple way to provide a free gift, if your application is eventually going to be a paid application, is to offer testers free lifetime access.

Feedback from your beta testers is going to be invaluable for finding problems and making improvements to your application. However, sometimes beta testers may miss an issue with your application, or perhaps they might just not send you details of all bugs and issues they encountered.

A useful tip for getting maximum value from your beta testers is to include error tracking and performance monitoring in your application. To achieve this you can use a tool such as Sentry.

Error Tracking and Performance Monitoring

For those who came in late – Sentry is a tool that automatically records detailed information about any errors that cause your application to hang or crash. Sentry can also monitor how well your application is performing during any potential slow or complex operations, such as network operations or graphics processing. Once Sentry has sent event data to the server, you can access information about your application’s errors and performance in the web portal. Here you can also assign people or teams to these issues and keep track of the status of different issues across different application releases.

To begin setting up Sentry to log events in your application, you’ll need to create an account, create a project, specify Android as its platform, give it a name, hit Create Project, and your Sentry project is ready to be connected in your application. You’ll be taken to a page that covers how to configure Sentry in your application.

First you’ll add the Sentry library to your application as a dependency.

Android allows you to add dependencies, including third party dependencies, in the build.gradle file. (We looked at the build.gradle file in the previous article.) This won’t be too unfamiliar to you, if you’ve added dependencies in Xcode using Cocoapods, Carthage, or the Swift Package Manager.

The Sentry docs describe the changes you should make to the build.gradle file, but you’ll basically be doing three things:

  1. Adding MavenCentral as a repository. (this is a public central repository, similar to the Cocoapods central repository)
  2. Ensuring you are using the correct version of Java to ensure that Sentry is compatible with your project.
  3. Adding the Sentry SDK as a dependency.

As soon as you make changes to the build.gradle file, you will see a Sync Now button appear. Click on that, wait a few seconds, and done. You can now use Sentry in your project.

Before anything else, you’ll want to initialize the Sentry SDK for your project with what’s called a Data Source Name, or DSN. The easiest way to do this is by adding one line to your Android manifest file. Again, see Sentry docs for more detail.

Now your application will automatically capture any errors. After your beta testers have tried out your application, you can check out the page for your application on the sentry site, where you’ll find useful information on what type of errors were being generated and what events lead up to the error occurring. These events are called ‘breadcrumbs’.

Your application will also automatically monitor the performance of your application, in all sorts of ways. It measures the performance of launches for all activities, fragments, or the application itself. It measures the performance of HTTP requests, file operations, user interaction, and even detects slow or frozen frames. Check here for a full list of what Sentry automatically monitors.

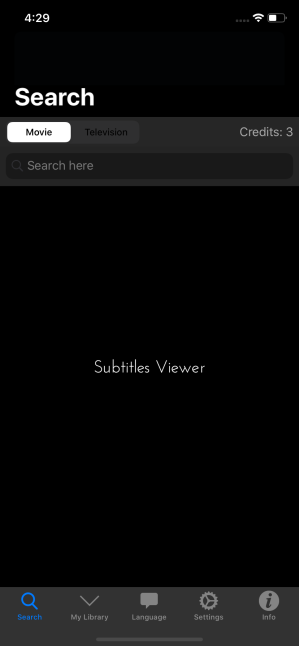
If the automatic performance instrumentation doesn’t cover your needs, you can also add custom performance monitoring to your application. For example, when a user in Subtitles Viewer downloads a subtitle, I started monitoring the performance of parsing the subtitle file. I did this by creating what is called a transaction:

ITransaction transaction = Sentry.startTransaction("parse subtitle", "parse");

When data is returned from the search, I called:

transaction.finish();

This gives you useful information on your application’s page on sentry, showing how your beta testers experienced the performance of your application. In my example, I was able to check out how quickly downloaded subtitle data is being parsed into a subtitle ready to display to my beta testers.

Of course, once you have submitted your final application to Google Play, you are able to continue to monitor for errors and performance in your users’ application using Sentry, and quickly diagnose and resolve any problems that might pop up.

Pre-launch report

Another great resource for checking your application for any improvements, is a feature of Google Play, called the pre-launch report. The pre-launch report is generated by Google Play when you upload an application for closed or open testing. Google automatically runs your application on several devices, simulating navigating and using your application as a user would, and reports back any issues it finds, such as accessibility or stability issues.

Once you have given your beta testers enough time to look over your application, you’ve made any changes based on tester feedback and data from Sentry and you are confident that your application is ready f§or the world, guess what? You are ready to submit your application.

Submitting your Application

If you have made it this far, it’s actually straight-forward to now go ahead and publish your application on Google Play. You have the choice to either ‘promote’ an existing release (perhaps one you were testing in a closed or open test), or to create a new release. You will need to fill in ‘Release notes’ – information describing what is contained in this release, and then hit ‘Review release’. You will be taken to a page where you can do a last minute check on any details. Here you could potentially find that there are still some issues that Google Play has found with your release that may need attending to. When you are happy with your release, you can now hit the Start Rollout to Production button.

Just like the App Store, your application will be under review by Google, and after a day or so, you should see your store listing on Google Play, visible to users and ready to download.

I hope this three part series articles on converting your iOS application to Android has been useful.

This post was originally posted on Sentry.io, link here.

Tagged with:
Posted in Android, Java

Converting Your iOS Application to Android: Part 2

This post was originally posted on Sentry.io, link here.
In my previous article, we looked at reasons for converting your iOS application to Android, and things you’ll want to consider when porting your application across. In this article we’ll take a deeper dive into developing in Android compared to iOS.

Before you consider converting your iOS application to Android, you of course will need to convert your own skillset from iOS development to Android development. Though this can be an intimidating prospect at first, you will soon realize that there are many similarities between developing for iOS and developing for Android, and your experience developing for iOS will go far in preparing you for development in Android.

In native iOS development you most likely work in Xcode. In native Android development you will probably find yourself working in Android Studio. (Of course, there are a number of other alternatives to building applications for iOS and Android, such as cross-platform tools like Xamarin, React Native or Flutter, but in these articles I’m going to be focusing on mobile application development using these native tools.)

Let’s take a closer look at the differences – and similarities – between developing for Android and iOS.

Migrating your skills to Android

Just as when you first opened Xcode, when you first open Android Studio you will probably be taken aback by the complexity of the interface. This development tool is massive. However, after you take some time to familiarize yourself you will find that much of it has similarities to Xcode. You’ll find a project window on the left showing your project files (similar to Xcode, project files may be organized differently to how you would find them on disk), a toolbar along the top containing all of your most common actions, such as running or debugging your application, a tool window along the bottom where you’ll find many common features such as the debugger window or console, and of course the biggest window is the editor window where you can edit your code or layouts.

In Xcode you’ll be used to adjusting the preferences for your application in the Project and Target Settings – you know the ones – up the top you’ll see tabs such as General, Signing & Capabilities, Info, Build Settings etc. It is here you can customize your application with details such as your application’s bundle ID, application version number, deployment target, external frameworks, application icons, supported devices, capabilities, device orientations etc. Xcode’s Build Settings has many similarities to Android’s gradle scripts – scripts that build when you build your application and configure your project. The script you’ll most commonly see is called the ‘build.gradle’ file – it is here you can do things such as define your applicationlication ID, application version number, target SDK version and dependencies. Other customisations are defined in an XML file called the AndroidManifest. Amongst other details, it is here you will find the application icon, supported devices, permissions, and screen orientations.

In Xcode you will be used to including assets such as images, icons, vector graphics or colors in a folder called an asset catalog(Assets.xcassets). In Android you will find a folder called res, short for resources, that contains all resources your application will need. You will find a folder called drawablethat contains images and vector graphics, and you will find a folder called mipmap that contains your application icons. Another folder called layout contains the XML files that represent layout files for each of the screens in your application. Another folder called values is a super useful concept in Android, containing XML files with values that can be accessed in your code or layouts, such as colors, strings or styles.

In iOS you will be accustomed to including variations (1x, 2x and 3x) for each image you include. The graphic variation which the system decides to use depends on the resolution of the screen. Instead of working in pixels, you are recommended to think of designs in points, which account for different pixel densities. The situation in Android is actually very similar. You are encouraged to include different variations for each image, just the variations have different names – MDPI (1x), HDPI (1.5x), XHDPI (2x), XXHDPI (3x) and XXXHDPI (4x). Similar to points in iOS, Android also recommends you to think of density independent pixels, which are called dp for short.

While applications in iOS are made up of various screens called View Controllers that control visual elements called Views, applications in Android are made up of various screens called Activities that can contain visual elements, also called Views. A common container within an Activity is called a Fragment, which is a concept I find especially useful – Fragments are reusable visible components that help you to build up your UI in a modular way. In Xcode you probably would have edited your view controllers visually using Interface Builder. As I mentioned earlier, layouts for screens in Android are represented by XML files – you can edit these visually by selecting Design mode.

Laying out your views in Xcode has a lot of similarities with Android. If you’re used to laying out your views with auto-layout in Interface Builder, over in Android you’ll find a lot of familiarity if you lay out your views with constraints, within a Constraint Layout. (Relative Layout may be of interest too.) If horizontal and vertical stack views are more your thing, in Android you’ll want to try laying out your views within a Linear Layout. If you build your applications with SwiftUI, Android’s native toolkit Jetpack Compose might be worth a peek. One last layout, Frame Layout, is often used to display just one view but can also be used for placing views on top of each other, regardless of whether they overlap. It might sound super basic, but I actually found Frame Layout quite a useful addition to my layout arsenal, for example when I wanted a layout to contain multiple child views that filled the available space.

You are of course able to set up layouts in Xcode storyboards that adapt for different ‘size classes’ – which represent different device types (eg tablet vs phone), resolutions, multitasking modes, orientations, etc. Android has a similar approach – when editing a layout in Design Mode, you can create a layout variation that adapts for orientation, device type. Android layout variations however, go much further, and can be generated for a variety of other qualifiers, such as density, country code, OS version number, or even whether the software keyboard is visible or not.

Of course, not every concept in iOS is directly transferable to Android, and you will find some concepts strange and unfamiliar in Android.

iOS developers used to describing the flow of an application using a storyboard might find it strange to work without this concept in Android development. Traditionally in Android, you would just design each screen (i.e. activity) or fragment visually. Any connections between activities are not outlined visually in Android Studio – instead these connections are described in XML in the Android Manifest file. Those who appreciate the visual representation of navigation in an Xcode storyboard will appreciate that you can now also visually represent navigation in your application in what is called a navigation graph. The navigation graph shows actions (you’d know these as segues in Xcode) that connect destinations, or fragments.

One concept that might feel a little more unfamiliar in Android is intents. At its most basic, an intent is an object that is sent to another part of your application, to request something to happlicationen. One common example is to send an intent to an activity, requesting it to start. The intent can contain data to initialize the activity too. This use case has some similarities to a segue in iOS. Intents are used for many other purposes – starting a service, for example, which has similarities to iOS’s Background Tasks, or delivering a broadcast, which has similarities to broadcasting a notification using iOS’s Notification Center. You describe your intent objects with the intent-filter tag in the Android Manifest. For example, one intent-filter I described in Subtitles Viewer triggered the View Subtitle activity to start when the user tapped on a subtitle file.

Migrating your coding skills to Android

In iOS development you probably work in Swift, and you may have had the pleasure of working with the much older and – let’s say unique – Objective-C. Android development has a similar story – Android development for many years was just possible using Java – a language from the 90’s, until support for developing in a fancy newer language called Kotlin was introduced in 2017. You can choose to develop in either, though Google suggests that “Android development will become increasingly Kotlin-first”. Kotlin also has a lot of benefits over Java, such as more modern features and safety. The 2021 Stack Overflow survey presents some interesting insights – Kotlin (61%) is much more well-loved by developers than Java (47%). That said, Java (35%) is still much more commonly used in general, compared to Kotlin (8%).

Though it can be intimidating to learn a new language, you’ll often find that many differences between languages are mere syntax. Comparing Swift with Kotlin or Java, you’ll find it fairly easy to follow along. Here is a section of code written in the three languages, for a taste of the different syntax between the languages:

Swift

let dice = [1,2,3,4,5,6]

func rollDice(diceOptions:[Int])->Int {
	return diceOptions.randomElement() ?? 0
}
for _ in 1...2 {
	print(rollDice(diceOptions: dice))
}

Kotlin

val dice : IntArray = intArrayOf(1, 2, 3, 4, 5, 6)

fun rollDice(diceOptions:IntArray):Int {
    return diceOptions.random()
}
for (roll in 1..2) {
    Log.d("test",rollDice(dice).toString())
}

Java

int[] dice = {1, 2, 3, 4, 5, 6};

int rollDice(int[] diceOptions) {
    return (new Random().nextInt(diceOptions.length));
}
for (int roll = 0; roll < 2; roll++) {
    Log.d("test",rollDice(dice));
}

As you can see, there are syntactical differences but with a little time to adjust, you’ll find it quite easy to follow along.

Just like Swift, Java and Kotlin are object oriented, imperative languages, that support classes, functions, protocols (called interfaces in Kotlin and Java), initializers (called constructors in Kotlin and Java), modifiers (such as publicprivate etc) and optional types (called nullable types in Kotlin, as they are in Objective-C).

Of course you will inevitably find some more significant differences between the languages too. A key feature of Swift is value types, or structs. Neither Kotlin nor Java have support for custom value types. That said, Kotlin has a type specifically for storing data, called the data class. Neither Kotlin nor Java support tuples either, though there are ways of approximating similar functionality to Swift’s tuple type. While for loops in Swift and Kotlin can loop over collections or ranges, Java supports for loops over collections or the more antiquated for loop syntax (as you can see in the example above).

One interesting difference that I found was how a screen was connected to its underlying code. In iOS development in Swift, you’ll be used to specifying the custom ViewController class in the identity inspector for a screen in the storyboard. In Android, it works the other way – instead of the layout specifying its code, the code specifies its layout. This way, instead of setting up IBActions and IBOutlets in your View Controller as you would be used to doing in Xcode, after specifying the layout for an Activity in Android in the Activity’s onCreate method, you immediately have access to its child views. The following shows how to achieve this in Java.

@Override
protected void onCreate(Bundle savedInstanceState) {
    super.onCreate(savedInstanceState);
    setContentView(R.layout.activity_quiz);
    //get views
    answerButton = findViewById(R.id.answerButton);
}

Which language did I choose to use, I hear you ask? Call me a traditionalist – call me reckless if you like, but I wanted to learn Android development using the more established Java initially, so I migrated Subtitles Viewer to Android using Java. (Full disclosure, I also have some experience developing in Android with Java but from several years ago.) I must say though, I am very curious to try out Kotlin, and will definitely be building my next Android project in Kotlin.

Migrating your Application

I think you’re ready – you’ve familiarized yourself with the similarities and differences in the interface of Android Studio, how to structure the assets of your application, and you’ve spent some time working up your skills in either Java or Kotlin. In short, you’re ready to go ahead and do the work of converting your application from iOS to Android.

In part 3 of this series, I’ll be looking at next steps – preparing your application’s online presence and beta testing your application, installing a third party library, checking your application for errors and performance issues using Sentry, and finally, publishing your application to the Google Play Store.

This post was originally posted on Sentry.io, link here.
Posted in Android, iOS, Java, Kotlin, Swift

Converting Your iOS Application to Android: Part 1

For anyone who noticed – I’ve been quite quiet on the blog front for a couple of years – one reason is I’ve become a father! It turns out being a dad takes up a lot of your time!

Another reason is I’ve been working on converting an app from iOS to Android, and re-learning Android on the way. I decided to write a 3 part series on this, and it has just been published on the blog at Sentry.io – see link here.

Here’s part 1 of the series for you to check out now:

_________________________________________________________________________________________

Converting Your iOS Application to Android: Part 1

One of the biggest catches of building applications with native tools is they only work on one platform, and migrating an application takes time. After eight years on the iOS App Store, 250,000 downloads and many user requests for an Android version, I finally decided to migrate my most popular application, Subtitles Viewer, to Android. Here is some of what I learned on the journey.

First things first – why bother? If you have an iOS application that works fine, why put in all the work to convert your iOS application to Android?

Why convert your iOS application to Android?

Currently, iOS has just 27% of the global smartphone market, while almost all the rest are Android based (72%). That adds up to about 3 billion (that’s billion with a ‘b’!) active Android smartphone users that are not able to access your application. In the US, the story is a little different, with iPhones actually leading Android 55% to 44%. However – even if your market is focused purely on the States, you are still turning away nearly half of your potential customers at the door.

The story isn’t quite so simple though – even though Android outnumbers iOS smartphones 3 to 1, iOS users are much more likely to spend their cash on applications than Android users. In fact, your application installed on 1,000 iOS devices will earn about 4.5 times more on average than if it were installed on 1,000 Android devices. If you’re looking to maximize revenue, whether through application or in-app purchases, having an iOS application is obviously a very important part of your business strategy. However, if you’re reading this article, you most likely already have an iOS application, and are questioning whether it would be worth building an Android equivalent. And though each application installed onto a specific Android device is likely to generate significantly less revenue, Android is still an important feature of generating application related income, due to the sheer numbers of Android devices. In 2021, iOS applications earned 63% of total global mobile application revenue. This means that if you decide to not migrate your iOS application to Android you will be missing out on almost 37% of your potential income.

So far we’ve looked at revenue, but what about costs? As you probably are aware, if you would like to earn income from application sales on an Apple device, you will need to be part of the Apple Developer Program, which costs US$99 annually. Google, on the other hand, only charges you a one-off registration fee of US$25. Both companies also keep a percentage of your royalties. Apple keeps 30% of the income your application generates, unless you qualify for their small business program, which reduces Apple’s percentage of your income to 15%. Android takes a similar percentage royalty to Apple, taking 15% of your application’s income for the first million dollars. After your application has generated more than one million dollars, then Android adjusts their royalties to 30%. If that detail becomes relevant to your situation, I believe kudos is in order.

Considerations when Converting your iOS Application to Android

On the one hand developing for all of these Android devices does mean many more potential users of your application, but on the other hand you will need to take extra care in ensuring your application works on the vast array of different Android devices. Even if you consider all iPhones Apple have ever released, at the time of writing you only reach 34 different devices. Compare that with Android – Wikipedia keeps a list of all Android smartphones ever released, and at the time of writing the list numbers greater than 1,400. Of course you won’t expect your application to work on early Android devices but even just including devices since 2020 adds up to nearly 500 devices. That’s 500 devices with diverse specs, memory, speed, screen types and resolution that you’ll most likely want your application to work on.

Working in iOS, you’ll of course be accustomed to working with devices built just by Apple, with a familiar look and feel. Android, on the other hand appears on phones and tablets built by a wide range of brands – the same Wikipedia list above lists 73 unique Android brands, many which even have their own custom firmware built on top of the Android system.

While all iOS applications are distributed via the App Store, Android applications in Android are generally distributed via the Google Play Store. That said, some brands, such as Samsung or Amazon, integrate their own proprietary application store either alongside or instead of the Google Play Store. If for example, you want owners of Amazon Fire devices to be able to use your application, you will need to submit it to the Amazon Appstore.

When designing your application for iOS, you no doubt would be familiar with the App Store Review guidelines. This describes all of the guidelines that your application must comply with to be successfully accepted to the App Store. Android has an equivalent set of guidelines for submitting to Google Play, which you can access at the Google Play Policy Center. These guidelines have many similarities with Apple’s, restricting developers from publishing inappropriate content, infringing intellectual property, transparent handling of user data etc. Of course, if you are to submit your application to third party app stores such as Amazon Appstore, this introduces yet another set of guidelines that you must adhere to.

Another document which I’m sure you’re familiar with is Apple’s Human Interface Guidelines, which provides you with recommendations to follow to be consistent with Apple’s design aesthetic. Android has similar guidelines, called the Material Design Guidelines, which have actually recently been updated for Android 12 (released October 2021), called Material Design 3. This is where you’ll see more differentiation between Android and iOS. There are different naming conventions, standard fonts, and styles of navigation. In iOS, custom views such as buttons, switches, labels, sliders and pickers are called controls, while in Android these are called material components. You’ll find many Android material components have a different look and feel to their equivalent (if there is an equivalent) in iOS. In iOS applications for example, you are likely to move between tabs at the bottom of the screen – in Android, tabs appear near the top of the screen, and if you would like tabs at the bottom of the screen you will need to use what’s called a bottom navigation bar. It would be a good idea to have a look at Android’s Material Design Guidelines and devise a plan on how to convert your application’s interface from an iOS aesthetic to Android.

If you don’t have an Android device, it’s worth considering purchasing one, and familiarizing yourself with the Android approach to user experience. There are also certain features that the Android emulator (the equivalent of Xcode’s simulator) are not able to reproduce, and to test them properly you will need a device. Also, nothing beats actually experiencing how your application operates on a physical device with a touch screen – it’s here, where you’re using the touch screen and experiencing your application on a real device, where you’ll often discover issues you might not have noticed in the emulator.

After weighing up the pros and cons of making the transition to iOS and considering all of these factors, I decided (admittedly after several years of procrastination!) that it was time to migrate Subtitles Viewer from iOS to Android.

In part 2 of this series, I’ll be doing a deep dive into similarities and differences in developing an application for Android vs iOS.

This post was originally posted on Sentry.io, link here.

Posted in Android, iOS, Java, Swift

Holy cow – You can preview UIKit code live in Xcode!

Now that SwiftUI is feeling more and more established since WWDC 2020, I’m in the process of getting properly acquainted with it. In my exploring I discovered something actually more relevant to UIKit that blew me away. (and it’s been around since 2019!)

So you can use SwiftUI code to preview UIKit objects live – UIViewControllers or UIViews – from within Xcode 😲, in the canvas.

Here’s how – first UIViewController:

Let’s say you have a UIViewController subclass ViewController.

  • Step 1: In the Storyboard (let’s assume Main) give your view controller a storyboard ID. Let’s say ‘ViewController’.
  • Step 2: Head over to your ViewController.swift file. Make the ViewController class final:
final class ViewController: UIViewController {
  • Step 3: Import SwiftUI:
import SwiftUI
  • Step 4: Again, in your ViewController.swift file, create an extension for ViewController, implementing the  UIViewControllerRepresentable protocol, with its two required functions:
extension TermsViewController: UIViewControllerRepresentable {
    func makeUIViewController(context: Context) -&amp;amp;gt; ViewController {
    }
    func updateUIViewController(_ uiViewController: ViewController, context: Context) {
    }
}

We can ignore the updateUIViewController function as this is used by a SwiftUI parent to update the model data of the view controller.

  • Step 5: Return our View Controller from the makeUIViewController function. We can do this with the UIStoryboard.instantiateViewController function.
func makeUIViewController(context: Context) -&amp;amp;gt; ViewController {
  UIStoryboard(name: "Main", bundle: nil)
    .instantiateViewController(
    withIdentifier: "ViewController") as! ViewController
}
  • Step 6: Set up a preview provider that returns your View Controller as a preview:
struct ViewControllerPreviews: PreviewProvider {
  static var previews: some View {
    ViewController()
  }
}

Just like that, BAM, the canvas appears to the right of the ViewController, and within it, your view controller as it would appear in the simulator. But that’s not all – press the play button to the bottom right of the ViewController, and a live version of your view controller will actually run, right there in a panel next to your code, just as if it were SwiftUI. Holy cow!

Oh – and one more thing – if you want to preview a UIView rather than a UIViewController it’s pretty straightforward – just extend your custom view class with UIViewRepresentable rather than UIViewControllerRepresentable!


Tagged with:
Posted in Swift, SwiftUI

Making a simple toggle button with UIButton

It’s actually pretty straightforward to turn a UIButton into a toggle button. (checkbox, switch, whatever you prefer to call it!)

We can make use of the isSelected property that UIButton inherits from UIControl. All we need to do is connect a ‘Touch Up Inside’ action to the UIButton, that toggles this property:

@IBAction func toggleButton(_ sender: UIButton) {
  sender.isSelected.toggle()
}

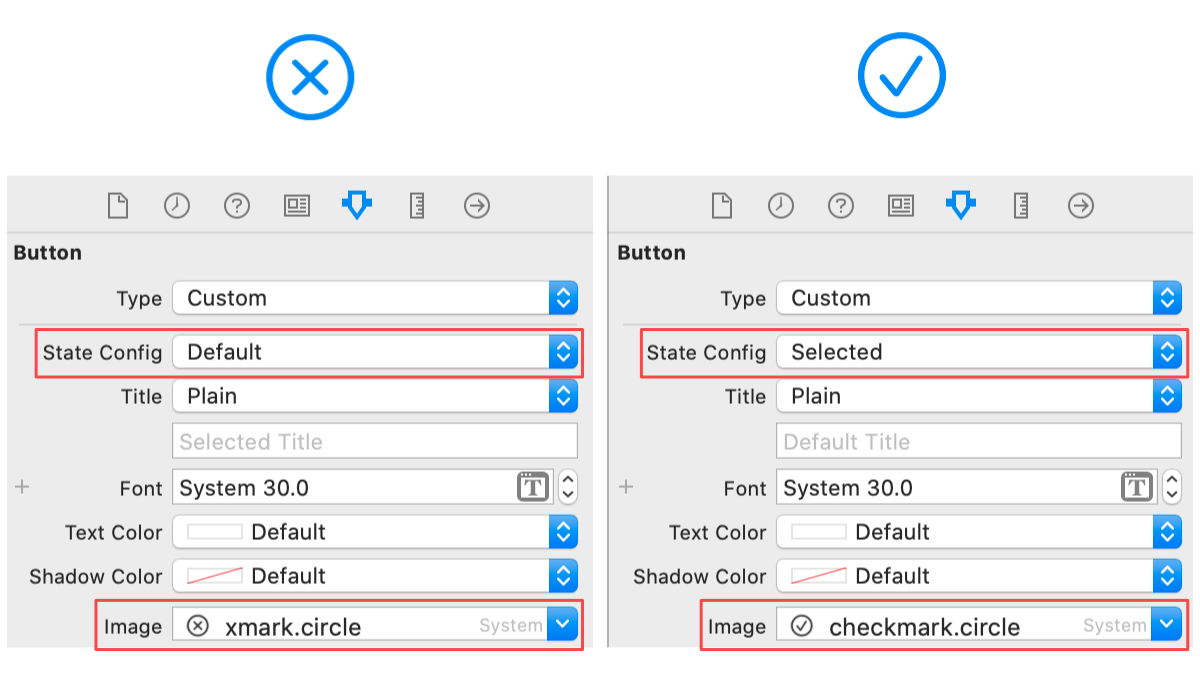
Pretty easy right? Just like that, our button now toggles between the ‘Default’ and ‘Selected’ Control States. We can customize how these states look in the attributes inspector for the button.

Here I have customized a button to display either a tick or cross, depending on whether it’s selected, using SFSymbols ‘checkmark.circle’ and ‘xmark.circle’:

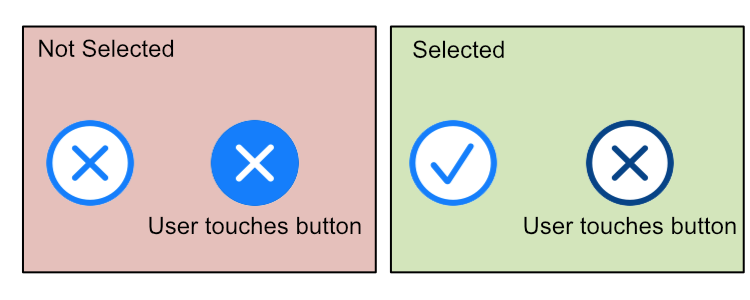
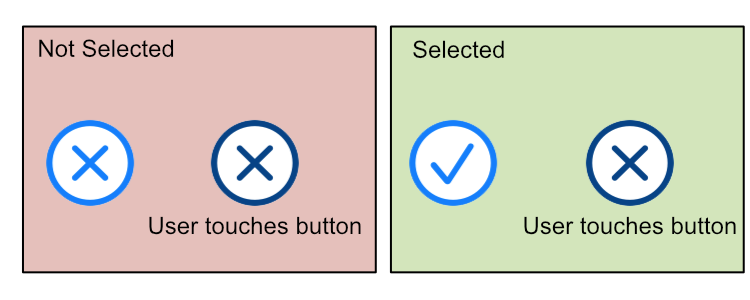
This seems to work pretty well, except for one minor detail. When the user has their finger down on the button, the button defaults to the ‘Default’ state (although darker). This works ok for the ‘unselected’ state, but doesn’t look quite right for the ‘selected’ state:

No Highlighted state selected.

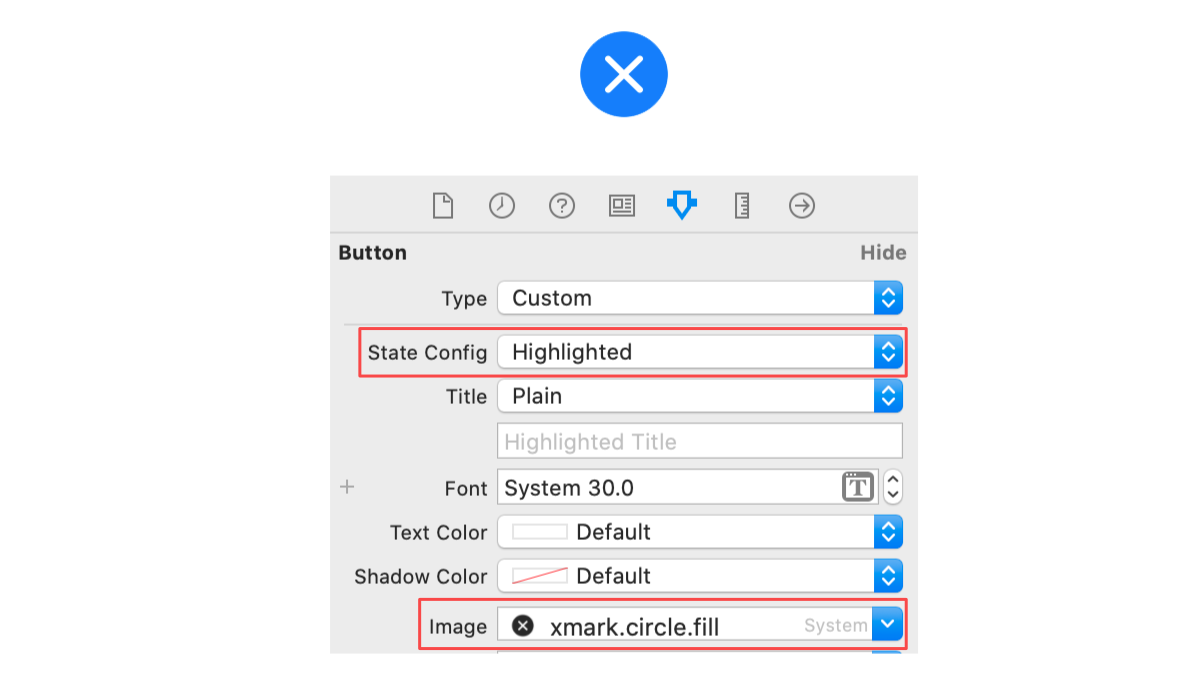
How can we modify this state? If you open the ‘State Config’ combo box, you’ll find another state called ‘Highlighted’:

In UIButton this state refers to the state the button is in while the user’s finger is on it. Great! So we can modify the Image for this state too in the Attributes Inspector. Here I’m setting the image for the ‘Highlighted’ state to ‘xmark.circle.fill’:

Testing this out on the app, we see that this didn’t actually help us much! Sure, our ‘Default’ state has a neat ‘Highlighted’ state now, but our ‘Selected’ state still is defaulting to the ‘Default’ state when the user holds their finger down on the button:

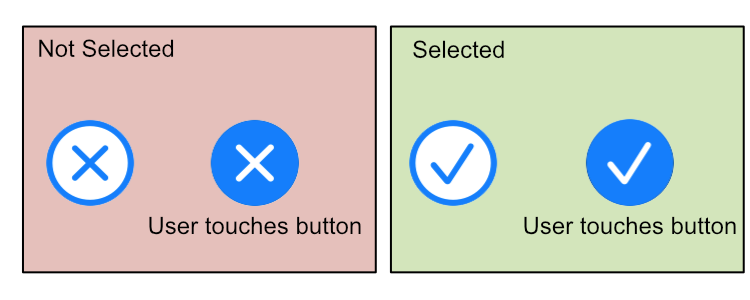
What we need is to define the state for both ‘Selected’ AND ‘Highlighted’. Unfortunately that isn’t possible in the storyboard, but fortunately for us, we can do it in code. Just set up an @IBOutlet for your button, and then set the button’s image for this state in the viewDidLoad method. Here I am setting the image to ‘checkmark.circle.fill’ if the button is selected and the user holds their finger down on the button:

@IBOutlet weak var button: UIButton!
override func viewDidLoad() {
  super.viewDidLoad()
  button.setImage(UIImage(systemName: "checkmark.circle.fill"), 
                  for: [.highlighted, .selected])
}

Finally! If we test the app now the button’s states should now be much more intuitive:

TL;DR

So — here again are the steps to creating a simple toggle button:

  1. Customize the button(for example, its image) in the attributes inspector of the storyboard for three states — ‘Default’ (off), ‘Highlighted’ (over) and ‘Selected’ (on).
  2. Connect the button to an IBOutlet so that you can set up a fourth state (a combination of ‘Highlighted’ and ‘Selected’) in the viewDidLoad method:
button.setImage(UIImage(systemName: "checkmark.circle.fill"), 
                  for: [.highlighted, .selected])

3. Connect the button to an IBAction that actually performs the toggling:

@IBAction func toggleButton(_ sender: UIButton) {
  sender.isSelected.toggle()
}

That’s it! Your button should work.

A reusable toggle button subclass

Of course, if you prefer you could set up a subclass of UIButton that handles the toggle operation for you:

import UIKit
class ToggleButton: UIButton {
  @IBInspectable var highlightedSelectedImage:UIImage?
  override func awakeFromNib() {
    self.addTarget(self, action: #selector(btnClicked(_:)), 
                   for: .touchUpInside)
    self.setImage(highlightedSelectedImage, 
                  for: [.highlighted, .selected])
  }
  @objc func btnClicked (_ sender:UIButton) {
    isSelected.toggle()
  }
}

This subclass contains an inspectable property highlightedSelectedImage that you can use to specify the image to display in the elusive fourth state (‘Selected’ and ‘Highlighted’) that is otherwise not available in the attributes inspector.

Connecting your button to this subclass in the identity inspector, you can now completely set up your toggle button in the storyboard. Hooray!👍


Tagged with: ,
Posted in Swift

Tiling a background image – sans code!

I recently wrote an article on a simple custom UIView class you can use to tile an image. Unfortunately – this doesn’t help us in a LaunchScreen, where custom classes are not allowed. Fortunately – there’s another way to tile an image, it’s pretty straightforward, and it doesn’t require a single line of code!

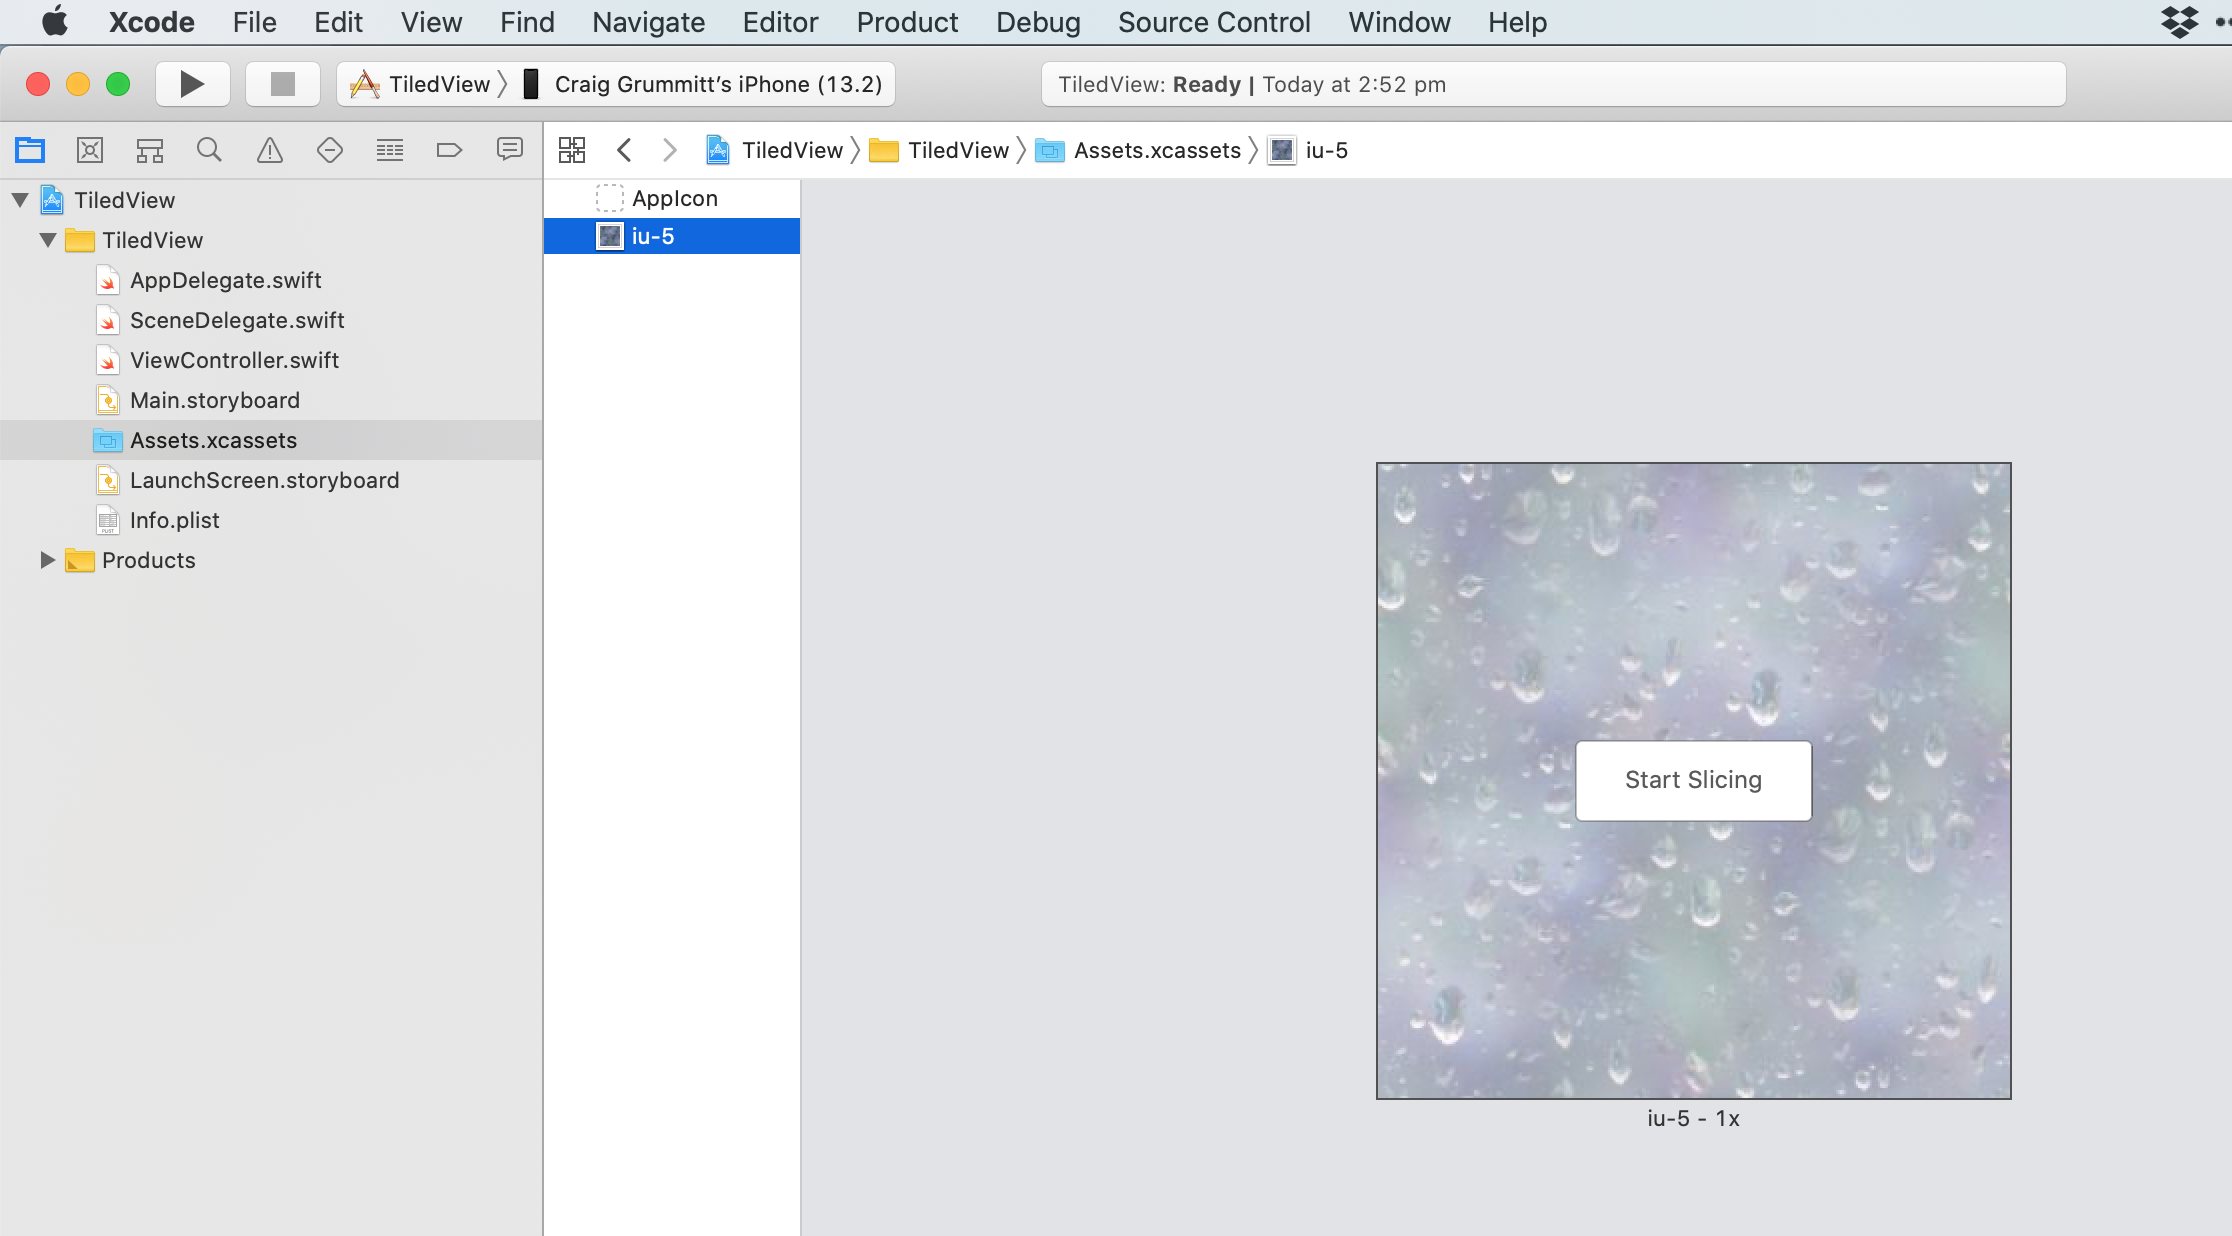
Step 1 – Bring in your image to tile into the Assets Catalog, then select Editor > Show Slicing.Screenshot 2019-11-12 14.51.47.png

Step 2 – The 1x, 2x and 3x options will disappear, and you will need to select Start Slicing.

Screenshot 2019-11-12 14.52.19.png

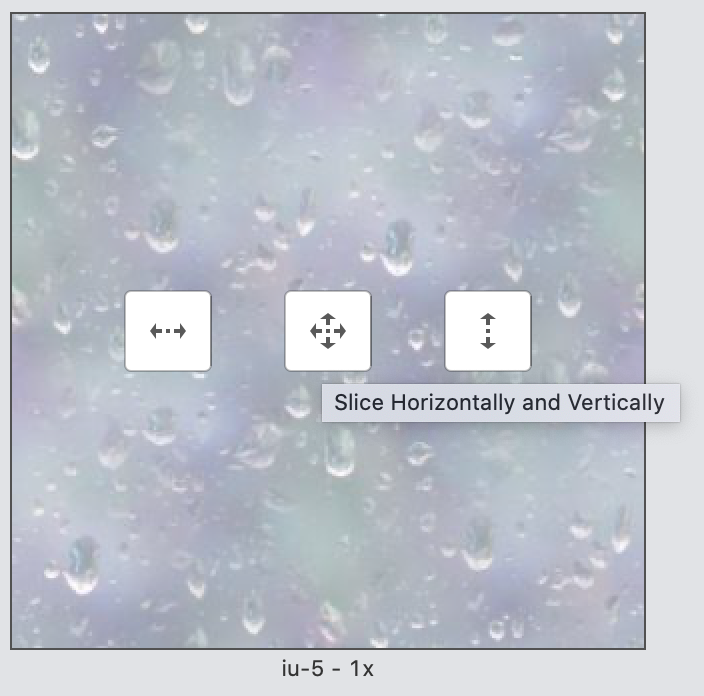
Step 3 – You will have the option to slice horizontally, vertically or both:

Screenshot 2019-11-12 14.52.27.png

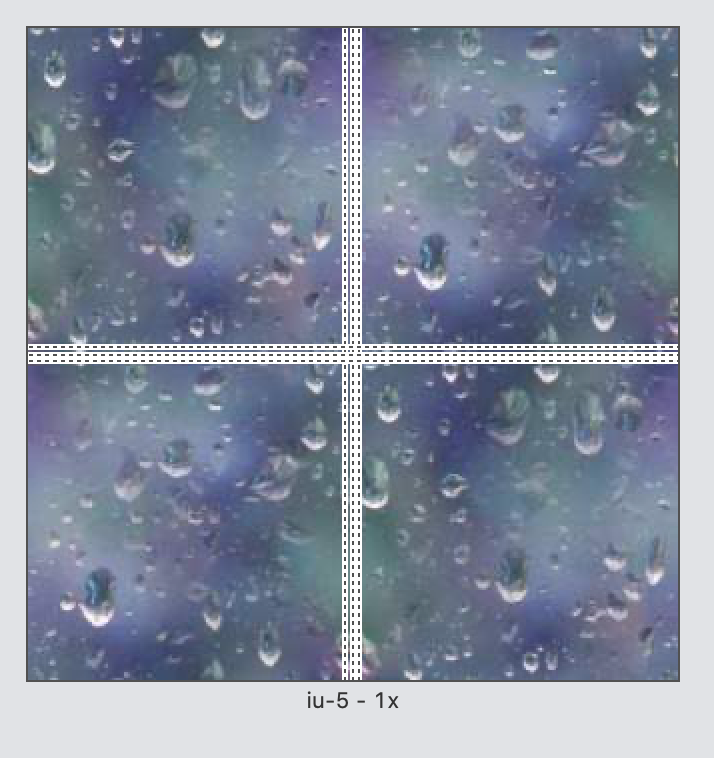
Xcode will assume you want to slice the image in the center.

Screenshot 2019-11-12 14.52.32.png

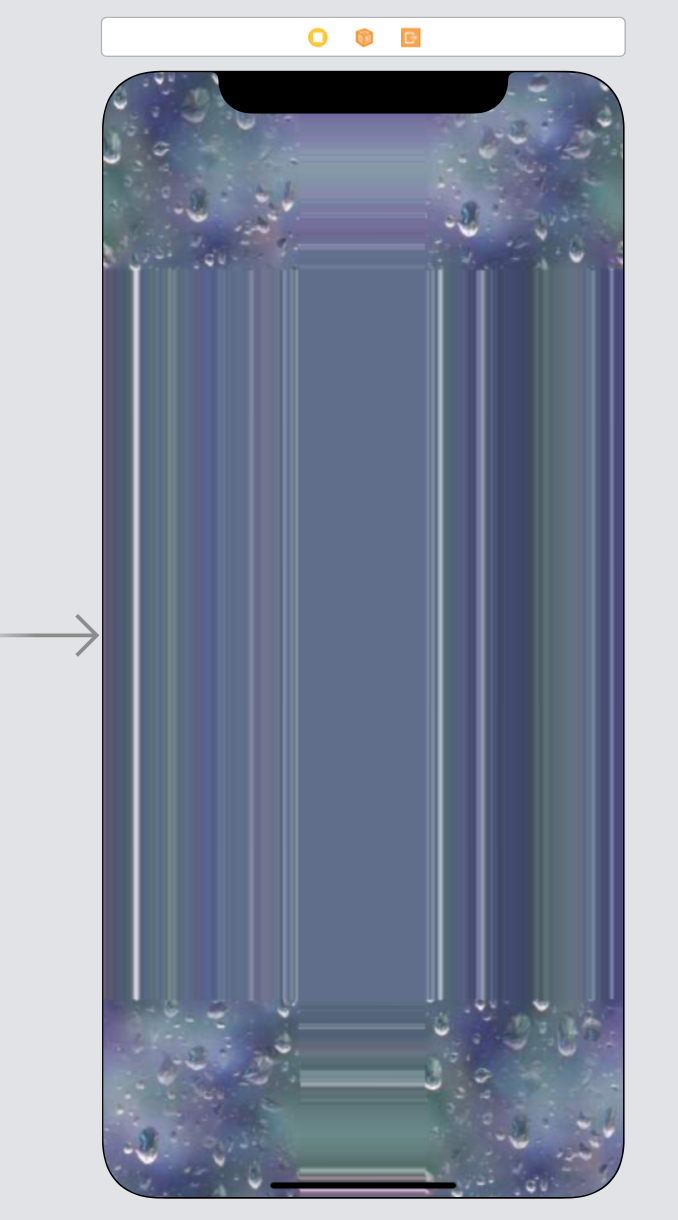
This will stretch the center part of your image, something like this:

Screenshot 2019-11-12 15.03.47.png

This isn’t what you want!

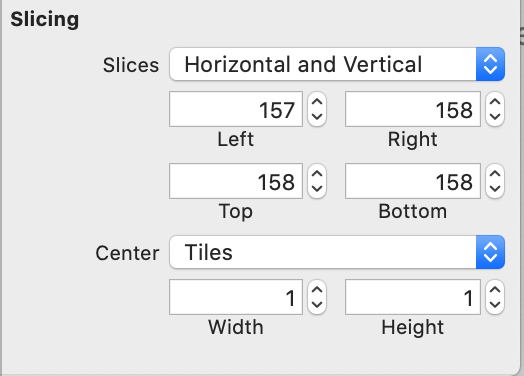
Here are the defaults Xcode chose when I opted to slice my image: (you can find these in the Attributes Inspector for the image – and don’t forget, we’re still in the Assets Catalog)

Screenshot 2019-11-12 14.52.44.png

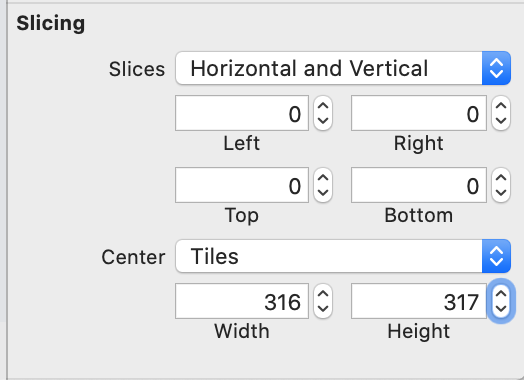
Step 4 – We need to set the Left, Right, Top and Bottom to 0, and the Width and Height of the Tiles to the width and height of the image. Something like this:

Screenshot 2019-11-12 14.53.05.png

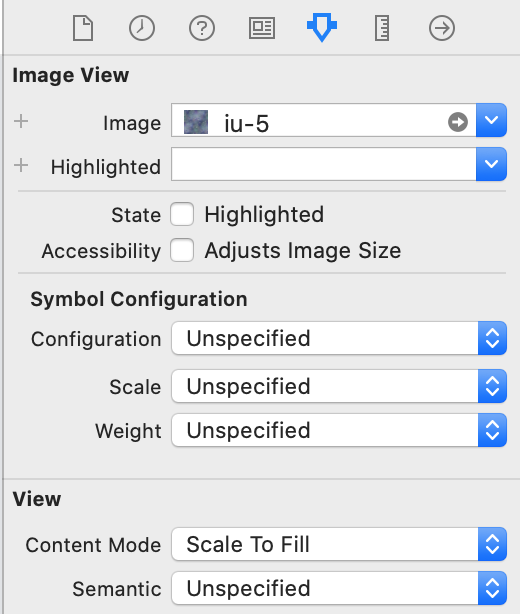
Step 5 – Now, back in the Storyboard, we can add a UIImageView, and in the Attributes Inspector, make sure Content Mode is set to Scale To Fill:

Screenshot 2019-11-12 14.54.03.png

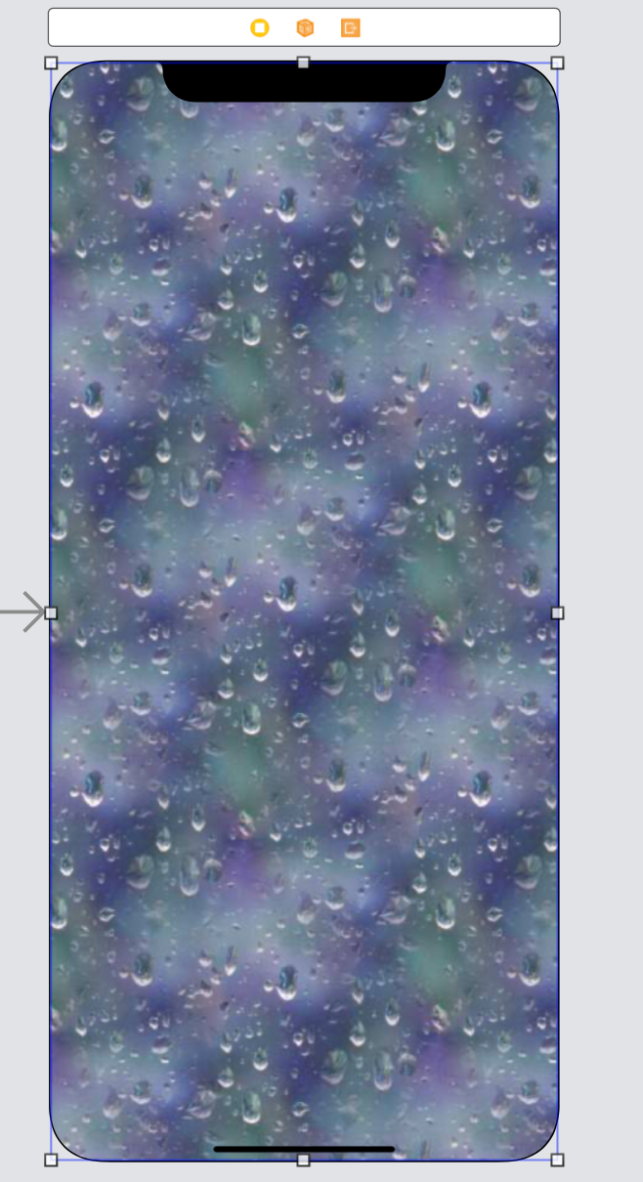
And there, like magic, the image in our image view will tile, and it works in the LaunchScreen storyboard too, hooray!

Screenshot 2019-11-12 14.54.08.png

Tagged with: ,
Posted in Swift

Tiled background image in custom UIView class

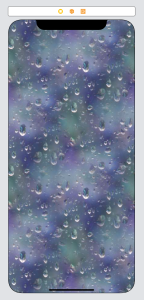
Sometimes you need a repeated or tiled image in your app, often for a background. Something like these rain-drops for example:

Here’s a simple UIView subclass that accepts an image parameter, and renders a repeated tiled image, even in the storyboard:


@IBDesignable
class TiledImageView:UIView {
@IBInspectable var image:UIImage?
override func draw(_ rect: CGRect) {
guard let image = image else {return}
UIColor(patternImage: image).setFill()
let path = UIBezierPath(rect: rect)
path.fill()
}
}

It creates a patterned image in a UIColor object, sets this as the current fill, and then fills the view’s rect with this color.

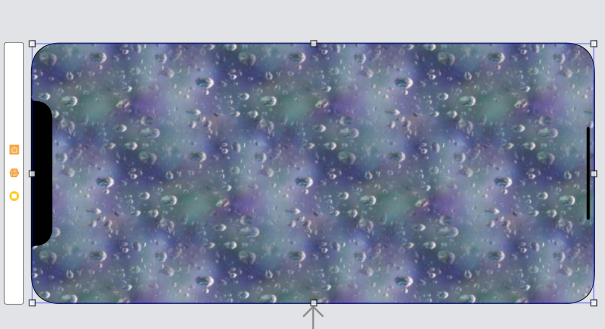
Here’s how it looks in the storyboard:

Tagged with: ,
Posted in Swift

Presentation Style default in iOS 13

This week is International Week of the Deaf, so to thank the community that have been a big part of my app Subtitles Viewer‘s success, Subtitles Viewer PRO is free for the whole week. Coincidentally, and perhaps unfortunately, iOS 13 is also brand spanking newly released this week, so just when the app is getting substantial downloads, some teething issues have presented themselves with the new release. Grrr…

Now I know Apple liked large navigation bars from iOS 11, but these navigation bars looked extra large. What’s worse, I found that after building the app in Xcode 11, when I swipe down, the whole app disappeared, leaving behind just the title screen!

Strange! I took a look at the good old capture view hierarchy and discovered a transition view peeking up above the navigation controller. Hmm, the plot thickens…

Screenshot 2019-09-26 16.33.48.png

What’s going on? It turns out this was all related to a change in default presentation style.

Blink and you’ll miss it – in the WWDC State of the Union 2019, this was announced:

Another component of iOS 13’s new look is cards. Since the original SDK, the default presentation style on iPhone has covered the full screen. We’re changing that default to a much more fluid card presentation. Cards provide a visual stack so you can see at a glance that you’re in a presentation. And even better, they’re dismissible with just a single downward swipe.

Screenshot 2019-09-26 23.22.05.png

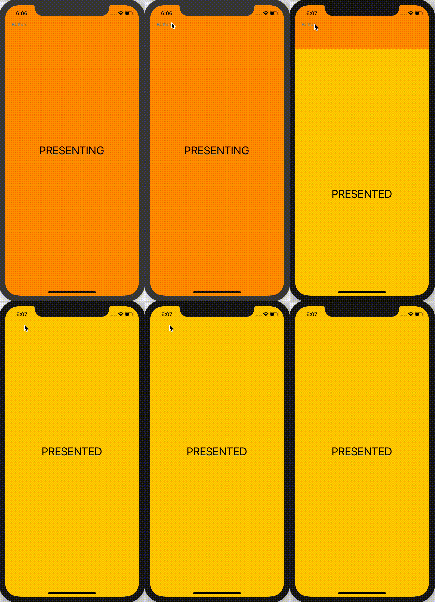
So previously segues would always default to a presentation style of ‘Full screen’, exhibit a:

Now, presentations on the iPhone default to what Apple are calling ‘cards’, exhibit b:

Note that after presenting the view controller as a card, you can swipe it down to remove it.

In practice, what has happened is that the default presentation style is ‘automatic’ which in iOS 13 is interpreted by UIViewController as ‘Page Sheet’. The documentation for UIModalPresentationStyle.automatic describes this: “For most view controllers, UIKit maps this style to the UIModalPresentationStyle.pageSheet style”.

This new feature could work well in some UX design, but in Subtitles Viewer, when the intro animation is complete it automatically segues to the rest of the app. Swiping down to see the intro animation again was definitely unwanted in this case.

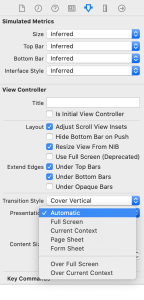
What to do about it? Turns out the solution is simple. If you select the presenting view controller in the storyboard and select Attributes Inspector, you’ll find the Presentation attribute is probably set to Automatic. Change this Full Screen, and you’re done, problem solved!


Tagged with: , ,
Posted in Swift